Chimney for a bath: types, device and installation
The rapidity of water heating in the washing room and the maintenance of heat in the steam compartment, fire safety and cleanliness of the air in the bath depend on a properly constructed chimney. Making this design with your own hands is not easy, but quite realistic.
Kinds
There are internal and external chimneys. The first set over the stove to the ceiling and lead to the street through the attic and roofing. The products of combustion pass through the pipe, providing room heating and reducing fuel consumption. And the pipe itself does not deteriorate due to the vagaries of the weather, since it is located inside the bath.
The disadvantages of the design include the complexity of the construction, as the chimney is carried out through the bath floors. If holes are formed in the pipe, it is possible for smoke to leak into the room, and there is also a high probability of fire.
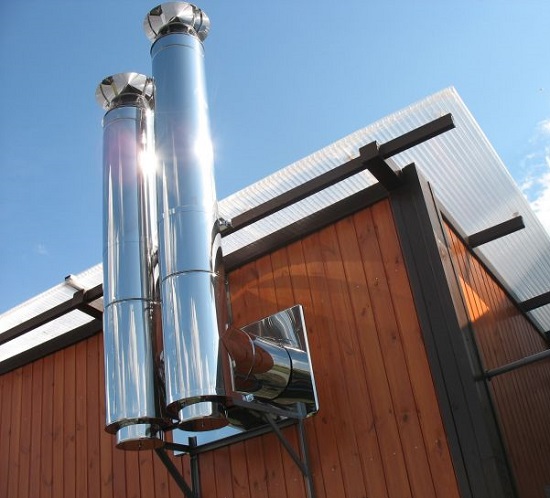
External chimneys are a pipe conducted outside the bath along the side wall. Such the chimney is easy to maintain and fireproof, but requires additional insulation and increases the consumption of firewood. Therefore, many are inclined to device internal chimneys.
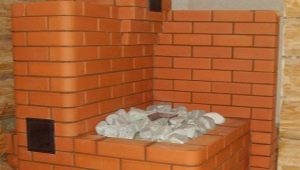
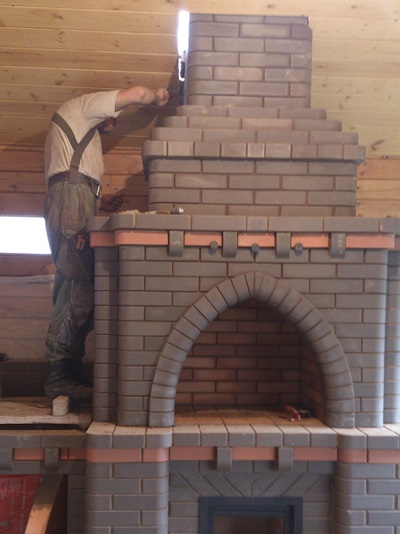
Chimneys are also divided into several types depending on the materials from which they are made. The traditional material for a rustic Russian bath with a closed heater is brick. This strong, durable and fireproof material heats up for a long time and retains heat well. The construction of a brick chimney is a laborious process., and on its rough inner surface, soot settles, trapping smoke in the pipe and reducing cravings.
Metal chimney easy to install, it has a smooth inner surface, it quickly heats the water. Steel pipes are heated in seconds, and cast iron heavy and assemble them alone is not so easy.
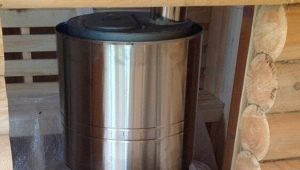
The ideal option is considered to be stainless steel, which has low weight, good load and resistance to high temperatures.

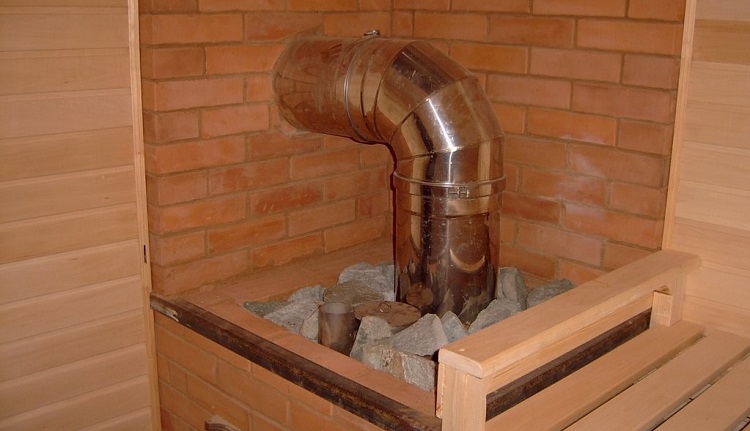
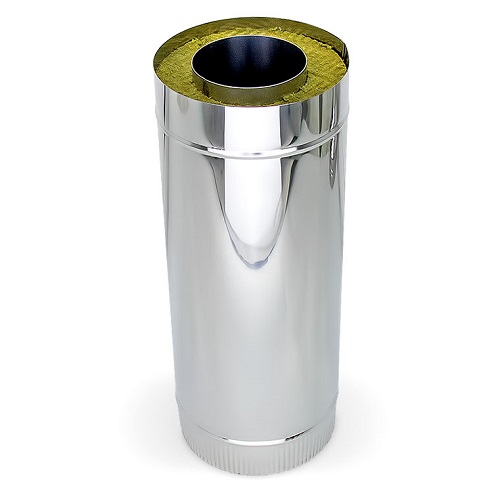
Temperature drops adversely affect single-walled pipes, therefore notice the double sandwich construction. The chimney-sandwich consists of two pipes with non-combustible insulation of basalt or ceramic wool, or vermiculite. A large galvanized or stainless steel pipe keeps the insulation dry, while a small pipe removes smoke.
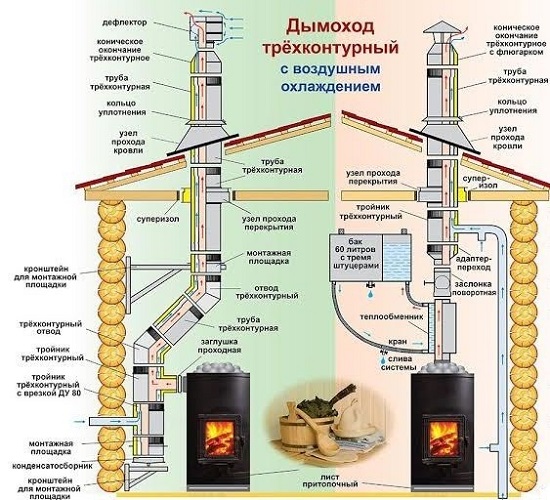
Three-circuit metal chimney kills two birds with one stone: removes smoke and ventilates the room. The principle of operation is simple: smoke comes along the main pipe, the second cools the first one, and in the third one they put thermal insulation. The ease of construction, ease of installation, maximum fire safety and long service life makes it most suitable for baths.
From modern materials Ceramic chimneys are considered the most reliablethat can withstand temperatures up to 600 degrees. Ceramics is waterproof and retains heat well, and is highly resistant to corrosion. It is designed for solid brick buildings.
Sometimes there is information about the design of chimneys from dead gas cylinders, scraps of pipes, silencers from a truck and other improvised materials.
Experts in one voice say about the fire risk of this situation,as the chimney must be designed according to all the rules. Then the rest in the bath will not only be comfortable, but also safe.
Size selection
The diameter of the chimney pipes is designed taking into account the capacity of the furnace, and its length depends on the location of the furnace construction in the bath. Regardless of the features of construction, the chimney must be installed in accordance with the norms of SNiP and the rules of the pipe-furnace works.
Combustion products of solid fuel must be removed through the chimney, which is installed vertically without reducing the cross section.
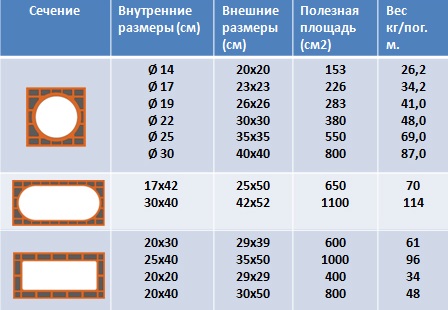
The thickness of the steel corrosion resistant chimney should be at least 1 mm, brick - 120 mm and concrete - 60 mm.

Non-combustible insulation will protect the structures adjacent to the chimney and floors made of combustible materials. In this case, the concrete or brick walls of the chimney should be at a distance of 130 mm from the wooden coatings, and ceramic - 250 mm.
The depth of the pockets at the base of the pipes is up to 250 mm. They have holes for cleaning, closed by special valves. If several stoves are installed in the bath, each must have a separate chimney.
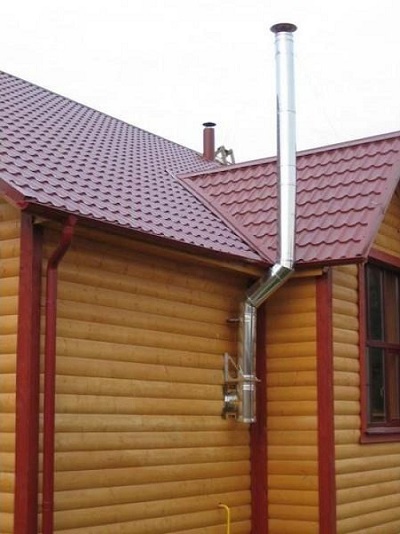
The higher the chimney, the better the thrust, any objects near the mouth of the chimney worsen it, so the height of the pipes must be at least 5 meters. As for the height chimney on the roof, it should rise more than 20 cm above the flat roof. If the pipe is located one and a half or three meters from the ridge, it is placed no lower than the level of the ridge, and its height exceeds 50 cm.
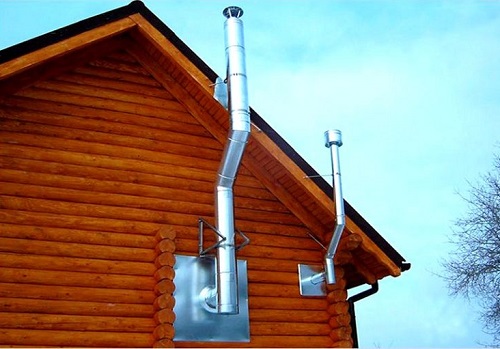
If the distance between the ridge of the roof and the chimney exceeds three meters, mentally draw a line from the ridge to the pipe down from the horizon at an angle of 10 degrees: the installed pipe must be above this line. In general, the chimney should be 50 cm above the top of the building.. If the roof of the building is made of combustible materials, the height of the chimney should reach one or one and a half meters.
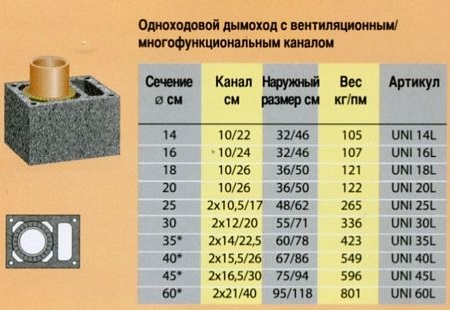
The parameters of the chimney are strictly prescribed by the standards of SNiP. So, for complete removal of flue gas, the internal diameter of concrete and brick chimneys should be at least 140x140 mm with a furnace power up to 3.5 W, 140x120 at 3.5-5.2 W and 140x270 at 5.2-7 W.
The circular cross section of steel and ceramic chimneys is at least 16 cm with a furnace with a capacity of up to 3.5 W, 19 cm - from 3.5-5.2 W and 22 cm with a power of 5.2-7 W. On the chimneys of solid fuel stoves put the valve size 15x15 mm.
Manufacturers Rating
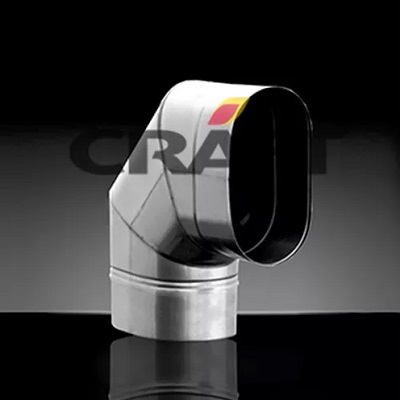
Most buyers prefer lightweight and easy to install stainless steel structures. Judging by the reviews, the leading products of three domestic producers: Ferrum, "Feringer" and Craft.
"Feringer" specializes in the manufacture of products from heat-resistant black steel. The 3 mm thickness and the ability to withstand high temperatures (up to 600 degrees) allows the installation of pipes inside the steam room. These chimneys are durable, do not darken from the heat, they are safely carried through the ceiling.
Their only drawback is the standard diameter of 110 mm.

Ferrum and Craft plants specialize in the production of stainless steel chimneys. The difference is that Ferrum produces both stainless steel and galvanized steel. At the same time, the first one is intended for single-circuit and internal walls of double-circuit chimneys, and the second one is only for the external pipe of a sandwich chimney.
Steel Craft Products resistant to aggressive environmental influences. Molybdenum, titanium and nickel contained in them make the chimney resistant to corrosion and oxidation, high and low temperatures, and also increase its strength.

Device
Ideally, the chimney is a horizontal structure, but in most cases its parts are arranged both horizontally and vertically.
Therefore, complete the chimney attached special connecting elements:
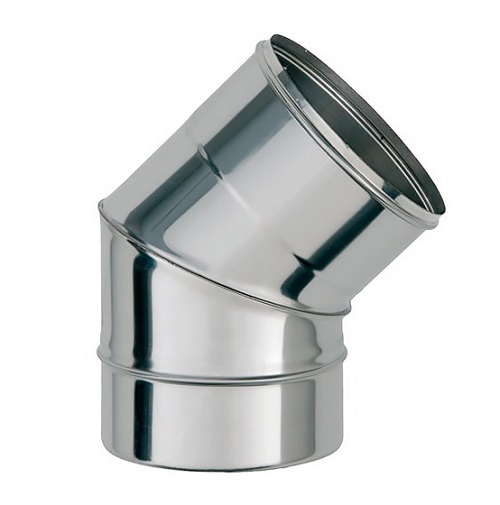
Knee responsible for the smooth connection of the elements of the chimney. When choosing this connector, note the angle of inclination.
Three hole connector need to be attached to the pipes. If this is not done, smoke will enter the bath rooms, which is not conducive to a pleasant rest.
The tee is easy to remove from the ash thanks to the easily removable element in the form of a glass.

Nipple protects against strong heat adjacent to the chimney structure, and therefore necessary in the presence of wooden floors. This element is used as pipe insulation if the attic and roof are made of combustible materials.
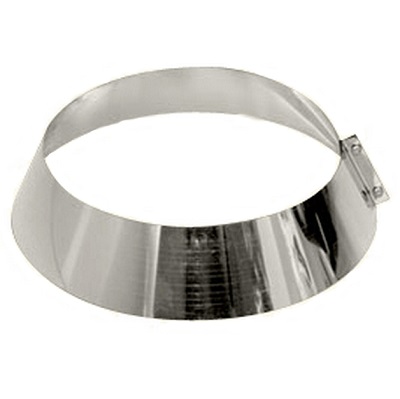
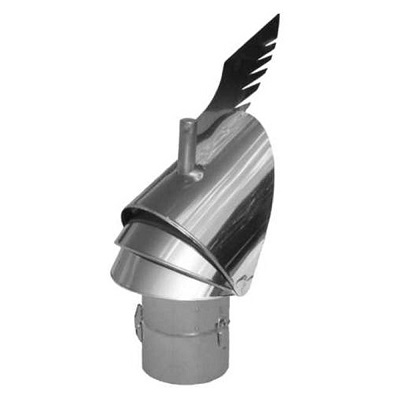
Roof trim or skirt tightly connects the roof to the chimney, protecting the interior from rain and snow. Well, the umbrella installed at the top of the chimney protects the entire structure from the vagaries of the weather, from the destruction of the material, and from insects.
In addition to the connecting elements, the standard kit includes fasteners - clamps and brackets for fastening the structure and gates that regulate traction. Spark arrestor, which is an iron grate with a visor, protects the building from fire sparks.
There are a number of important elements of the chimney, without which it is impossible to imagine the equipment of the bath:
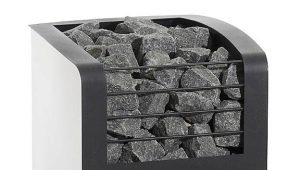
The heat exchanger is a tank with a thickness of steel plates 114-115 mm, installed as the starting element of the chimney. It is used to protect bath attendants from contact with the hot surface of the furnace and accelerate the process of heating water.
A classic example of a heat exchanger is an economizer, which is installed above a bath boiler or stove. This device has anti-corrosion and acid-resistant properties, equally suitable for large and small bath rooms.
Air circulates through the convection tubes of the economizer, so that the ingress of carbon monoxide into the external pipes and in the bath compartments is excluded.


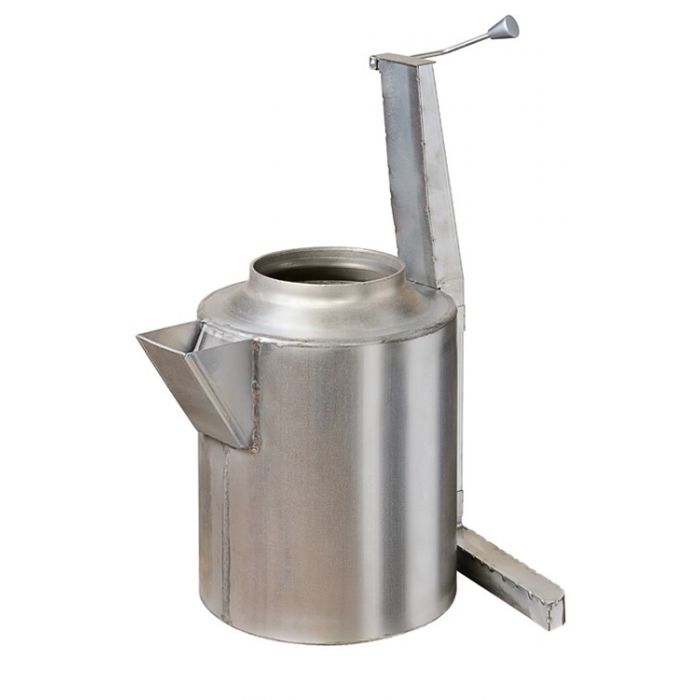
Steam gun or homemade steam generator is used to create wet or dry steam.The device saves water, does not take up much space. It is easy to assemble it yourself: metal pipes with a diameter of 5-7 cm are placed above the heater so that water is poured from one end, and steam comes from the other.
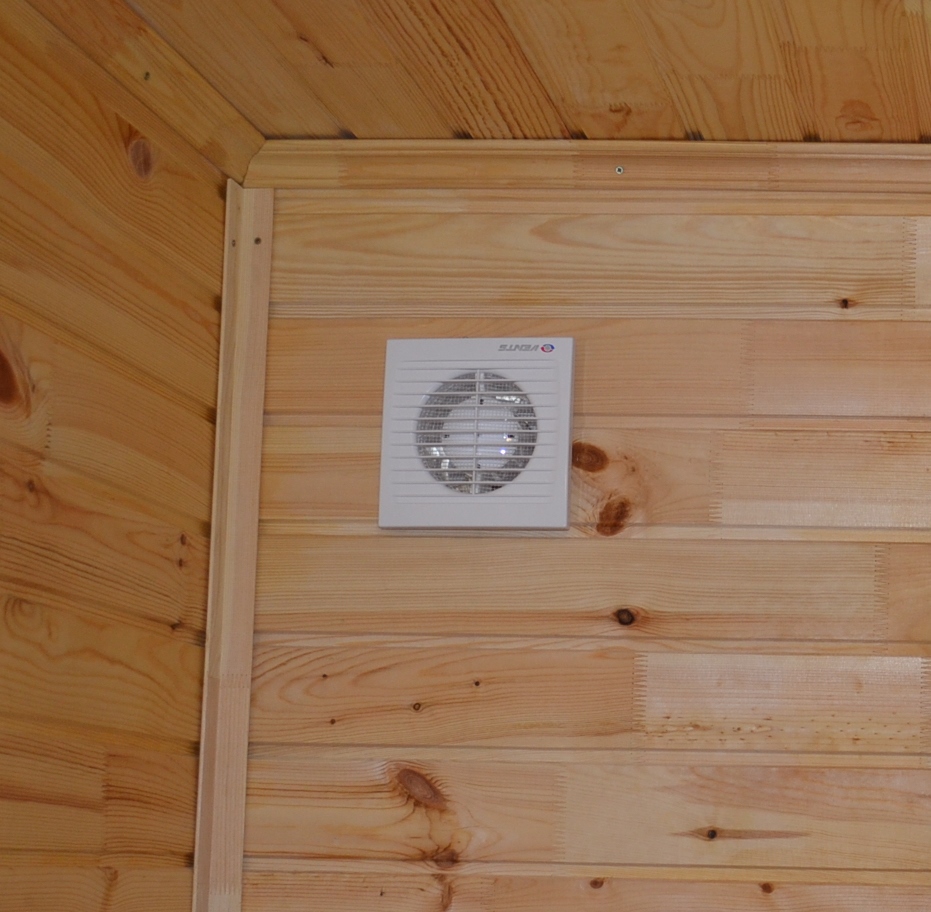
To prevent fungus and air stagnation, it is important to debug the ventilation system. But if in a wooden bath the room is ventilated through the gaps between the boards, then for baths made of brick or concrete it is necessary to equip the hood. Properly arranged ventilation provides fresh air, allows to dry the washing compartment after bath procedures and evenly distributes warm air in the steam room.
Installation
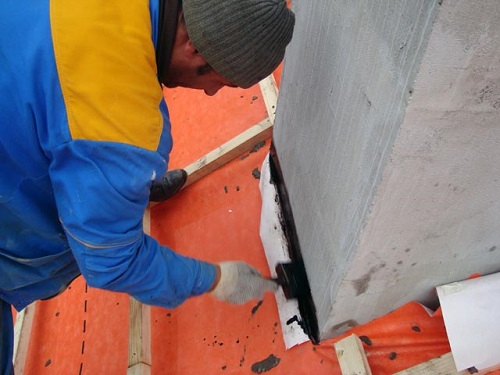
Arrangement of the chimney is not easy and time consuming, but if you follow the instructions clearly, it is quite possible to assemble a reliable and fireproof unit with your own hands. Immediately before installation, fasten high temperature resistant material to the walls of the bath (for example, asbestos plates).
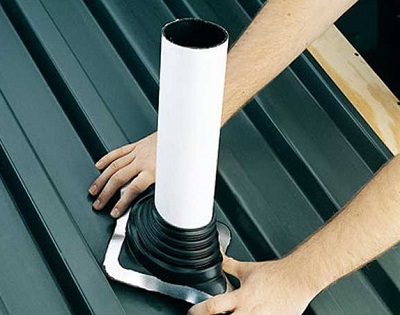
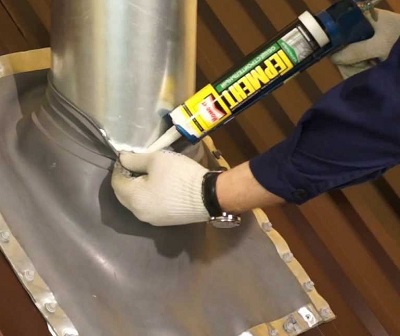
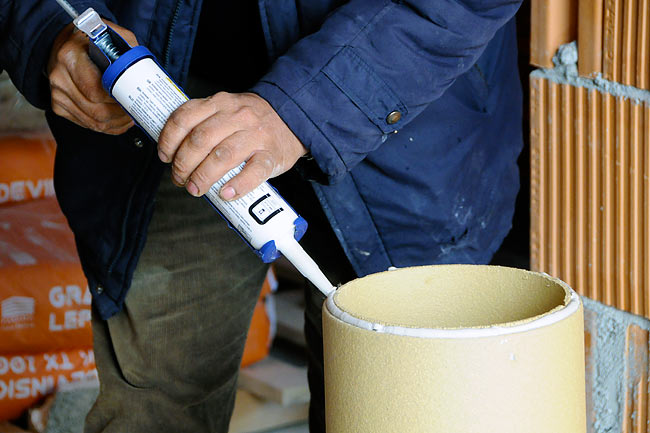
Make sure that the chimney joints are not at the level of floors and roofing. Coat the joints with heat-resistant hermetic compounds and additionally fasten them with clamps. Large gaps tightly filled with asbestos cord, and the rubber seal will be needed after the removal of the chimney on the roof.
Writing a step-by-step guide for installing each type of furnace is not possible, because everything depends on the characteristics of the building itself. But gradually consider the scheme of arrangement of the chimney on its own is quite real.
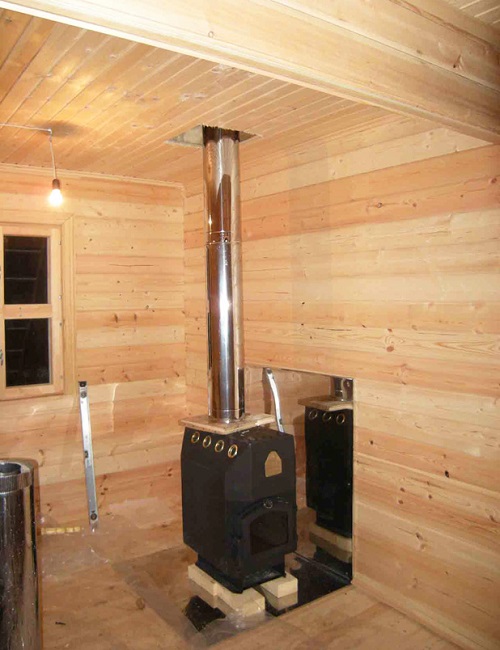
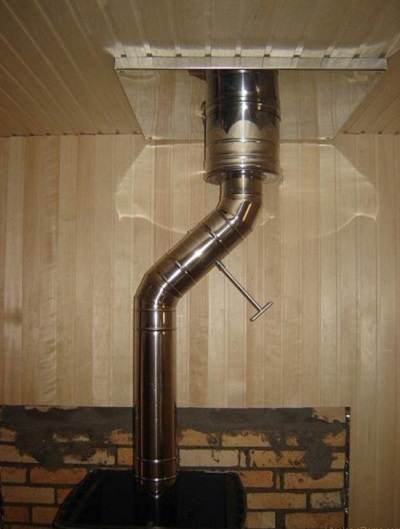
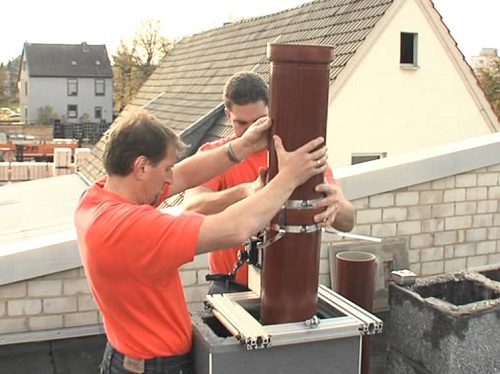
The most simple to install version of the internal chimney made of metal is installed as follows:
The first element of the pipe is attached directly to the furnace nozzle, followed by a gate that regulates the thrust.
To pass through the ceiling, make a square hole and collect a metal box with a through hole. The hole corresponds to the diameter of the pipe, and the height of the box is 0.4 m more than the thickness of the ceiling.
Install the duct in the ceiling, fix it, and then pass the pipe to the attic. The latter should be insulated with expanded clay or stone mineral wool, and for the box to make a cover with a through hole.
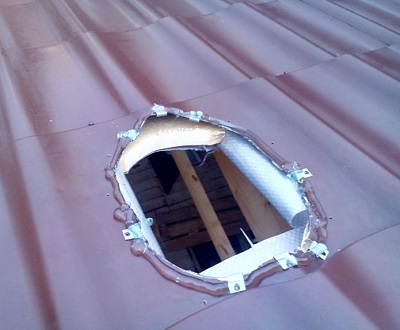
Then cut a hole in the roof, attach heat-resistant asbestos to it from the bottom, and from above, insulate the pipe with mineral wool or asbestos.
Upon completion of work, “put on” a hydraulic rubber protective cuff on the chimney and treat the joints with a sealant.
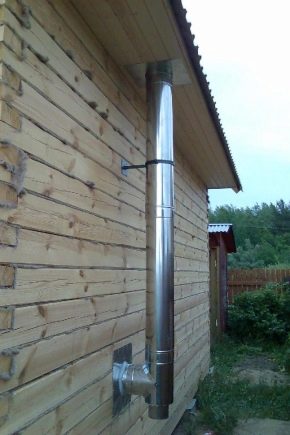
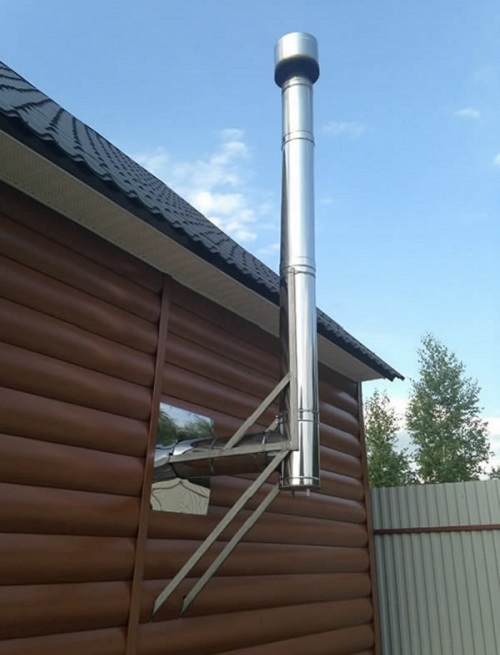
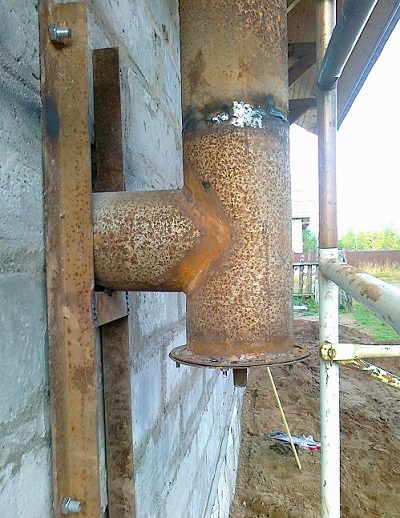
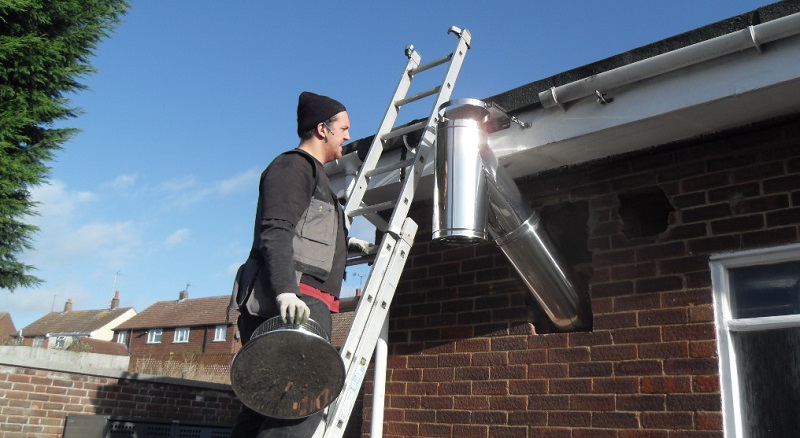
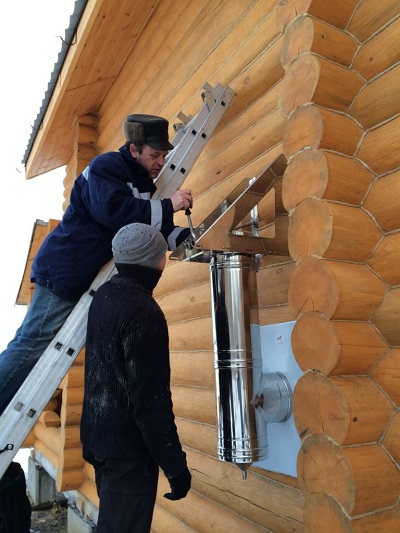
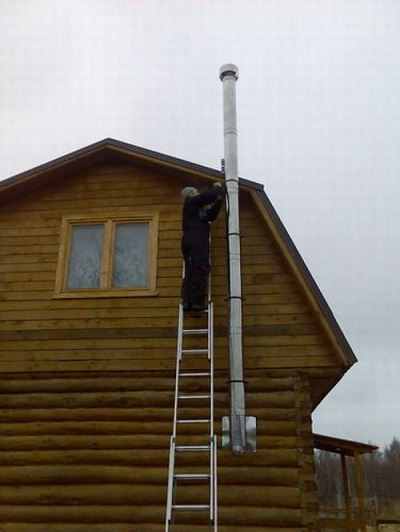
External chimney requires less time, since it is laid not through the ceiling, but through the wall. A metal elbow with a suitable bend angle is attached to the nozzle and then to the pipe. A hole is made in the wall, a metal box is mounted and the pipe is pulled out.
A tee is attached on the outside, which allows the chimney to be held up and down, and along the wall. The pipe is raised above the ridge about 0.5-0.6 meters, covered with an umbrella, and the slots on the wall are sealed with heat-resistant sealant.
These designs quickly vystyvayut, therefore, require additional insulation. In order not to complicate your life, use pipes with PU foam insulation, which significantly reduces heat loss and protects against freezing.
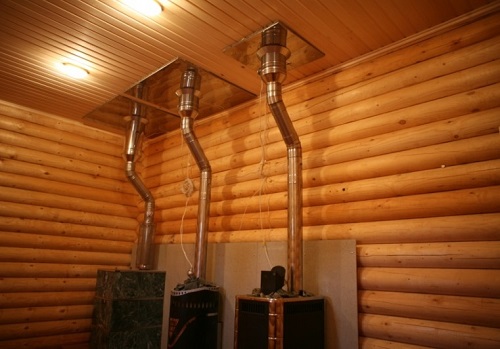
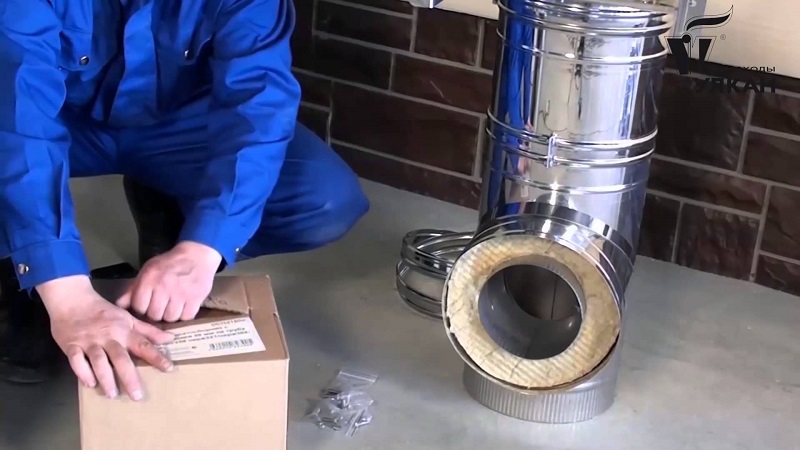
Metal sandwich chimneys are gaining popularity more and more. They include a layer of insulation that protects the external overheating and allows the internal pipe to be heated quickly.
Installation of such structures do so:
Mark the exit of the chimney on the ceiling and roof and make holes.Along the perimeter of the holes, about 10 cm is left for thermal insulation of the sandwich chimney from wooden floors. The place of entry of the pipe into the ceiling is covered with mineral or glass wool.
If the distance from the bath attic to the roof is more than one and a half meters, determine the place of the discharge unit, which is installed in the attic. Its metal corners and mounting elements will take over the load of the pipe and prevent the appearance of lateral vibrations.
The inner tube is tightly inserted into the chimney, all elements of the tube are inserted one into the other, and the joints and bends are fixed with clamps.
In the ceiling opening, a firebreaker is put, to which a tunnel is welded larger in diameter than the external sandwich pipe. Due to this, there is an increase in the stop area and increased stability under lateral loads. The final stage of the work is the sealing of the exit points and the joints and the installation of an umbrella on the chimney.
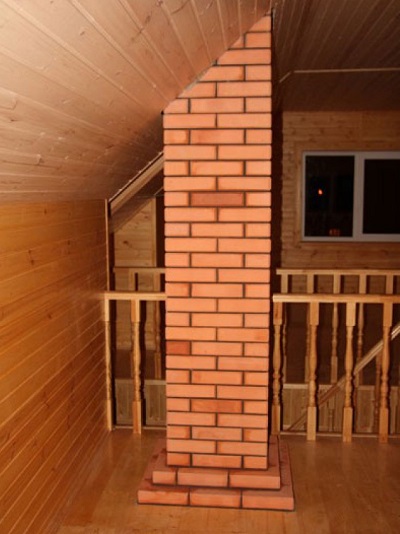
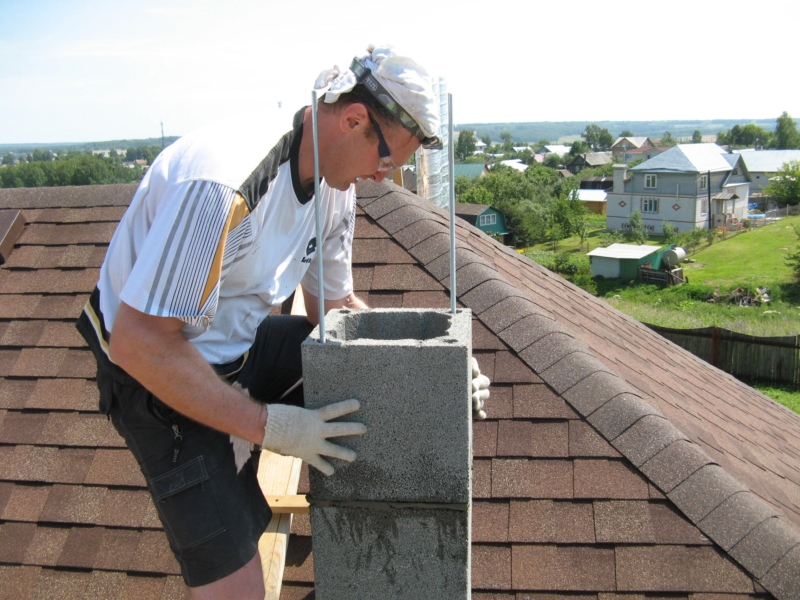
Brick structures have been and remain one of the most difficult, but they do not lose their positions due to high tightness and fire safety. Laying brick chimney in the room is better to perform on clay, and above the roof - cement-sand mortar.
So, we proceed:
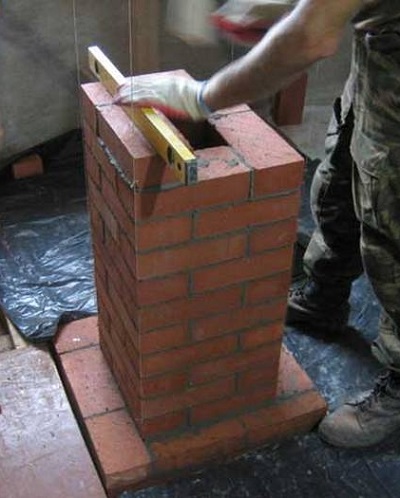
First you need to make a markup on the ceiling and roof using a level or plumb. Then saw through strictly vertical holes, prepare a solution.
The prepared part of the stove is placed on the prepared place. It is laid out vertically and make sure that its inner surface is flat, because irregularities reduce cravings. The correctness of the position of the grate is controlled by a thread stretched between the angle of the first row of masonry and the angle of the ceiling hole. The width of the chimney is half a brick.
Diffusers expand the outer walls of the chimney and securely fixes the chimney. To increase stability, use construction fittings: it should not be inside and visible - outside. When laying fuzzy, each new row by a quarter is above the previous one. As a result, the width of the chimney will be one brick, and the widest part of the structure will be at the level of the ceiling.
To fix the chimney, along the entire perimeter of the fuzzy, trimmed boards are nailed to the ceiling, which will hold the structure and prevent it from swaying from the wind.Then the fuzz is transferred to the riser, gradually reducing the width of the chimney, and put so to the roof.
An otter diverting rain and melt water is laid out similarly to fluff. In size it is a quarter of the brick exceeds the riser, and its height depends on the roofing slope.
It is important that the otter starts from the bottom of the roofing and is two rows above the top point.
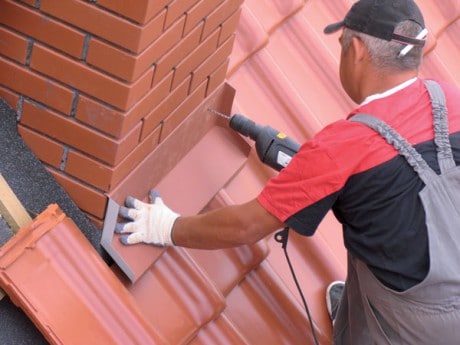
- Then lay out the neck of the structure, set the tip and a metal cap. The latter is fixed to the crate, and at the joints is fixed with a steel collar with a heat-resistant material. Ideal for roofs made of metal, and for the roof of corrugated.

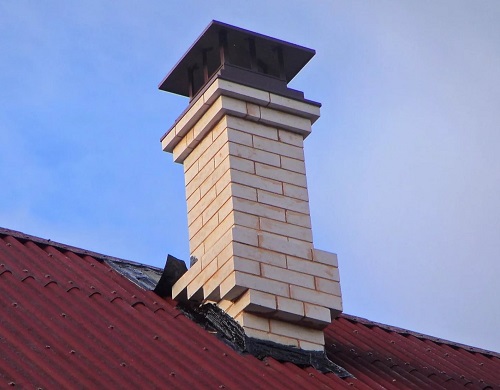
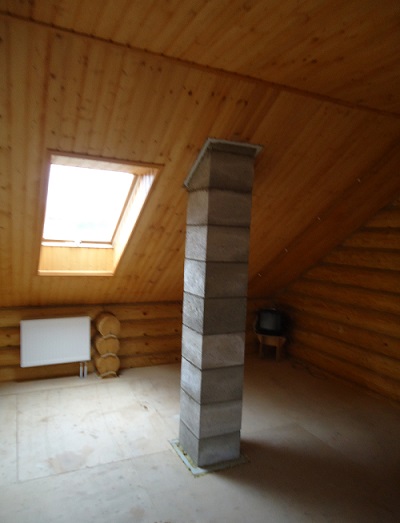
Reliable and beautiful ceramic chimney consists of an internal pipe, a heat-insulating layer and facing bricks.
It is set as follows:
Depending on the characteristics of the bath, ceramic chimneys are installed either on the hotel foundation next to the stove or on top of it. It is important that the place was perfectly smooth. Prepare a special glue and fittings meter length for additional fixation. Ceramic construction protects hardwood floors from heat,therefore, it does not need insulation when conducted through the ceiling and roof.
First, install two ceramic halves, insert reinforcement into the side holes. The gaps between the reinforcement and ceramic brick are poured with glue, while it is enough for the glue to join them in several places.
Ceramic pipe should be wound with a heat insulator in the form of mineral wool and attach it with a yoke. Similarly prepare all the pipes, the number of which must match the height of the structure.
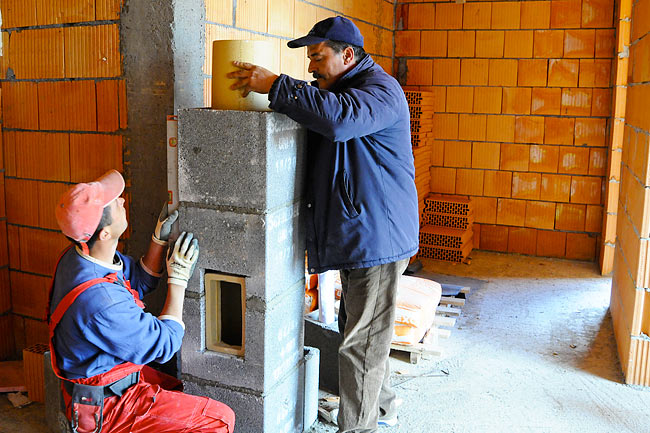
- The pipe is placed in a ceramic hole and check the correctness of its position. Then put the second on the glue and put it in the socket first. Construction "put" on the glue, not forgetting to remove excess from the inside of the pipe. The third, fourth and all subsequent pipes are installed in the same way.
- In the attic, fill the slots with wooden plinths, and then reinforce the structure with boards. If the height does not exceed one and a half meters, it is enough to attach the boards around the perimeter of the chimney and nail it to the attic floors.
For a higher version of the boards make additional fixation of wood or metal corners.Construction work is completed with reliable sealing of the roof with factory elements.
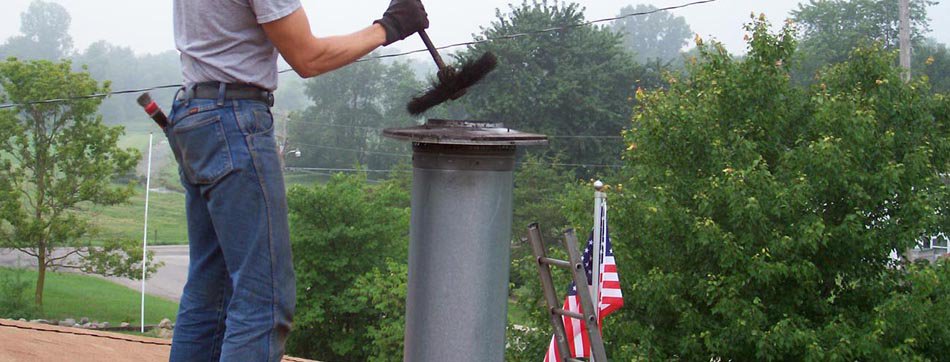
Cleaning
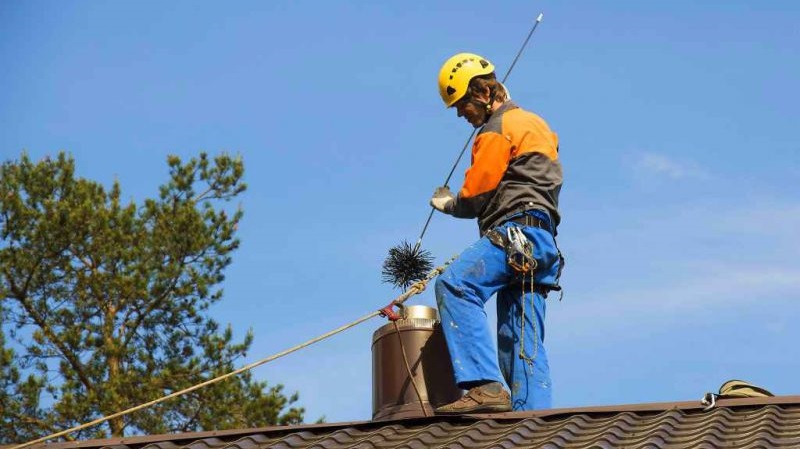
Bath chimney cleaned at least twice a year - in spring and autumn. There are a number of reasons for this: the resulting condensate, foreign objects getting into the pipe, but often the chimney is cleaned from soot and soot. The latter depends on the type of fuel used: special briquettes or Euro-fuel slow down the accumulation of soot, but wood fuel increases the frequency of cleaning.
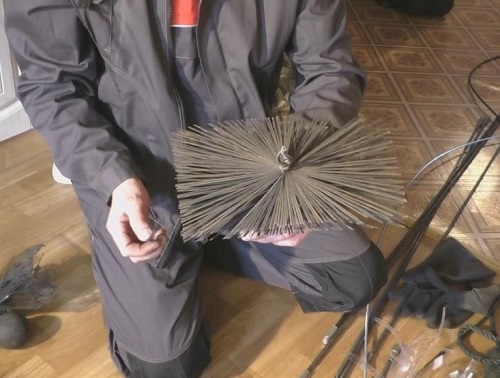
Today, there are three popular ways to clean the chimney. The traditional means of chimney cleaning is considered to be a ruff, which can be bought at any hardware store or made from scrap materials.
To make this simple device, you will need a broom with plastic rods, a washer, a self-tapping screw and a cable one and a half or two meters long with a load of two to three kilograms. The process of making a ruff looks like this:
Broom rods are placed in boiling water to soften, then unbend them in different directions and evenly distribute.
Fix unbent rods with a washer and screws.
At the base of the ruff with straps secure the cable with a load.
The final stage is fitting the size, because the ruff should be a little larger than the chimney. Correctly determine the size will help the template, cut out of cardboard.
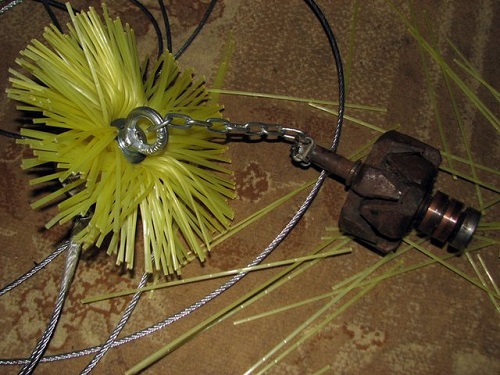
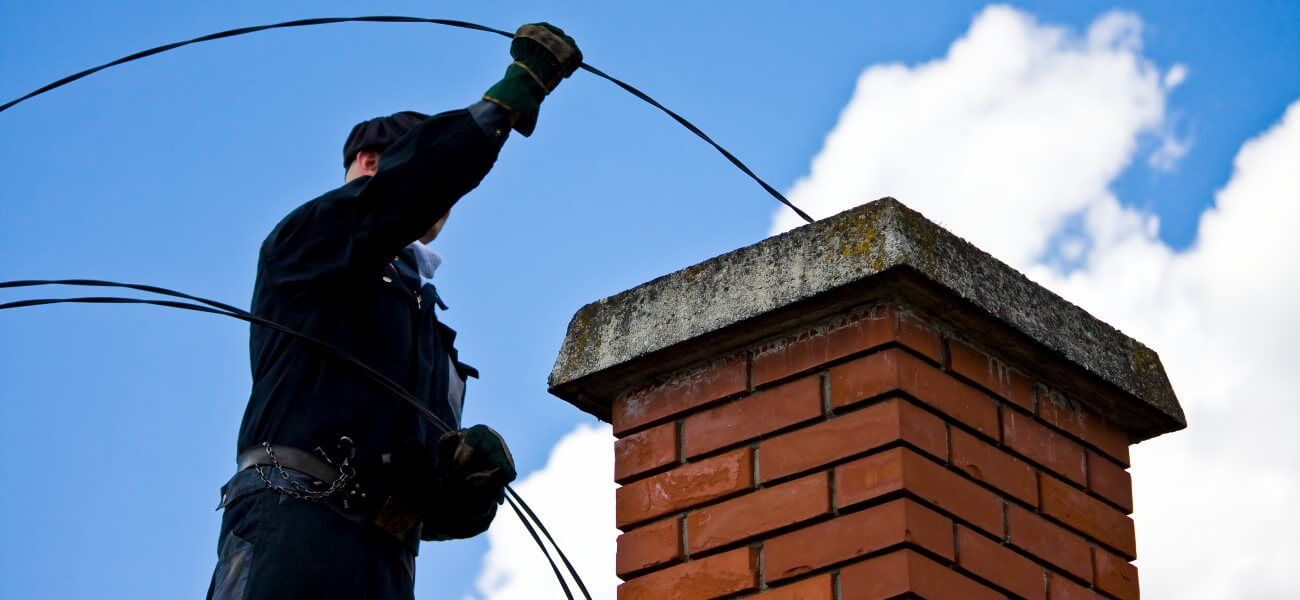
Cleaning the chimney ruff is very simple. The cargo is lowered into the chimney, then the ruff, and then the pipe is cleaned with translational movements. Another “home” cleaning tool is a hose.
Before they clean the chimney, first prepare a place at the furnace, pull the hose through the pipe and clean it, pulling it in different directions. In this case, the hose is good for cleaning from soot and soot, and the ruff also removes foreign objects.
Folk remedies such as potato peelings or combustible fuels are also distinguished by simplicity and efficiency. In the first case, a bucket of potato peelings is thrown into a red-hot oven (possibly less — it all depends on the internal dimensions of the oven). The starch released from the purification reacts with soot and it disappears within two to three days. True, experts advise to clean the chimney ruff or hose again.
Fuel of high combustibility represents dry aspen firewood. You open the chimney valve, the chimney valve, the door of the combustion chamber and keep the fire burning for two to three hours. During this time, soot and soot burn out completely.For such a cleaning chimney must withstand temperatures of more than a thousand degrees.
Modern liquid and solid chemicals are gaining popularity, which are placed in the firebox along with wood or coal. They quickly clean the chimney, are affordable, inexpensive and safe.
To prevent blockages, it is enough to burn aluminum foil with the fuel once every ten furnaces. It is important that it be burned out, not just flattened by the heat.

Possible mistakes
It also happens that despite all the correctness of the calculations, an error creeps into the design of the chimney. There are no reasons for panic, but it is important to know how to eliminate the unpleasant flaw.
Smoldering firewood, soot-covered fire door and smoke streams "speak" of a small burden. This occurs with heavy pollution or a short chimney. In the first case, the chimney is cleaned, in the second - increased with the help of insulated pipes. If the draft remains the same, change the diameter of the chimney..
Puffs of smoke escaping from the air holes indicate tipping over. This happens when the chimney is incorrectly removed or its upper part is not sufficiently insulated. Often the solution to the problem lies in the insulation of the chimney.
If the stove is barely warm, adjust the thrust.
To do this, install a gate, heat removal modules with metal fins acting on the principle of a radiator, or double-wall heat storage modules with stone chips or pearlitic sand instead of insulation.
The strong heating of individual parts of the chimney indicates shrinkage of poor-quality insulation. The construction should be replaced, and as a temporary solution, to assemble a heat insulating casing from GFL and fill it with stone wool.
To correct the errors in the design of the chimney help special nozzles-deflectors. The wind vane reduces the risk of tipping over and enhances it. Rotating is almost unsuitable for chimneys, as in calmness it worsens the craving, and the bane in the winter blocks the way to smoke. Electric pump allows you to provide quick kindling and reduce cravings.
How to conduct a chimney through the ceiling in the bath you will learn from the video below.